I’ve hung many shows with art groups, hung a lot of my own shows, and I’ve been a gallery assistant. I’ve learned a few tricks about hanging artwork quickly and easily.
Math
If you’re like me, you majored in art so you wouldn’t have to do math. And while you really don’t need all that algebra you learned, you do need to be able to do some basic adding and subtracting. So buck up, little artists! Luckily, we’re allowed to use calculators out here in the real world.
Tools
You’ll need a few basic tools for smooth installation:
Tape measure
Pencil and paper
Level
Hooks and nails
Calculator
Ladder
Glass or Plexiglas cleaner and paper towels (if necessary)
String (optional)
Preparation
Prepare your artwork for installation by attaching wire to the backs. Saw-tooth hangers are not reliable (and you won’t appear professional if you use them). It’s also recommended to put little rubber or felt pads on the back of the piece at the bottom. This helps to protect the wall from any paint rubbing off the frame. A bonus with the rubber ones – the can help keep the piece in place as you’re adjusting for level.
In some cases wire is not an option. You may need to hang the artwork using screws or you might need to make some sort of cleat. That’s a topic for another post.
Laying out the show
Bring all your prepared artwork to the space where it will hang. Start by spreading out the pieces and putting them against the wall where you think they might look good. Move the pieces around until you think they look perfect. Enlist an objective person to help with this.
Some things to consider – mixing up or grouping the artwork according to size, color, or theme. Some artists like to include one particularly strong piece on each wall. You might also consider hanging your strongest piece in the spot where the viewer will see it first upon entering the space.
The amount of work in the show is also important. You don’t want it to be sparse, but you also don’t want to overwhelm the viewer with too much to look at (unless, of course, that is your intent). Cay Lang touches on this in Taking the Leap:
“You should be able to look at each work of art without having the piece next to it insist on equal time. It is okay to glimpse other pieces with your peripheral vision, but it should be clear that each piece in the show is meant to be enjoyed as its own experience. If two paintings are placed too close together, they will be seen as one piece. Hanging too many pieces in a show is a common mistake of amateur artists, so a good rule of thumb is: Once you have placed the work, remove one piece from each wall.” (139)
Installation
OK, so now you have everything in its perfect spot. Let's get it on the walls.
Most artwork is best viewed with the center at eye level, which is usually at 60” from the floor. If you are hanging many pieces (and especially if you are hanging salon-style), it’s helpful to have a guide at the center point. You can create a guide by stretching a string across the wall at 60” (hang the string with nails or thumb tacks).
Gallery style
If you’re not grouping pieces together, this is a fairly quick and easy way to install artwork:
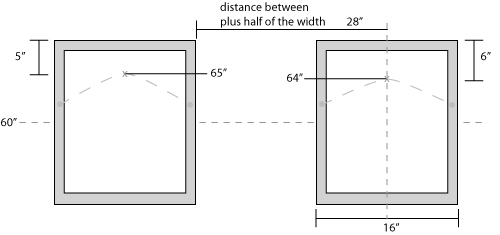
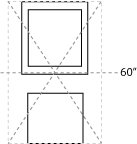
First, measure the height of your piece. Our example is 20” high
 Figure half of that: 10”
Add that to 60”, so 70” (the top of the piece will be 70” from the floor)
Put the end of your tape measure on the wire and pull up a bit to find the distance from the top of the taut wire to the top of your piece. Our example is 5”
 Subtract that from 10”, so that gives us 5”
Subtract that from 70”, so we will hang our nail at 65”
(This is really hard to describe in writing! Hopefully the graphics will help.)
Keep in mind that the wires will most likely be at different places on each piece, so you’ll need to measure the wire each time.
You’ll probably want to measure the distance between pieces, too, especially if they’re very close together.
Here’s a tip for doing that:
Figure the distance that you want to have between artwork: in our case, 20”
Measure the width of the next piece: 8”
Measure 28” from the edge of the first piece.
Then measure up 64” (our wire height changed on the second piece)
 You also need to take into account the position of the hooks. The bottom of the hook will be where you make your mark on the wall. So the nail will actually go in the wall above your mark:
 Salon Style (String method)
You’ll definitely want a string at 60” for this method.
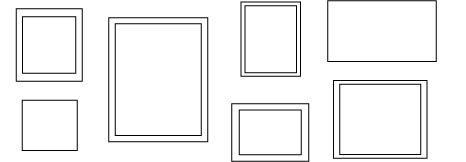
Arrange all the paintings on the floor so that you’re happy with the way they work together.
Measure the length of the wall: In our case, 120”
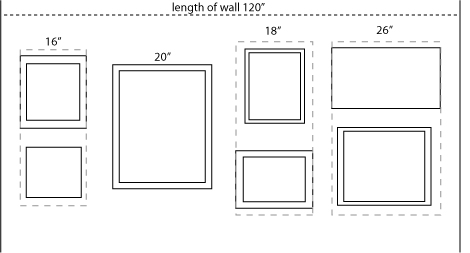 Measure the horizontal lengths of the paintings and add them together.
If there are paintings stacked on top of each other (we’ll call these a set), measure the widest one.
Add these measurements together: We get 76”
Subtract that number from the length of the wall: 120-80 = 40
Count the total numbers of sets of paintings and add 1: Our 4 sets + 1 = 5
Divide 40 by 5: 8 This is the amount of space that you will leave between sets of paintings and the walls.

Now decide how much space you want to put between the stacked or vertical pieces: We’ll choose 4”.
For the first set – add the heights of each painting and add the space between: This gives us 26”
 Divide this by 2 and add to 60. (13 + 60 = 73)
This is where the top of the upper piece will be.
Measure the distance from the top of the painting to the wire: Ours is 4”
Subtract this from that larger number: 73 – 4 = 69
This is where the hook will go for the upper piece.
 To figure where to put the hook for the lower piece, measure the distance from the top of the painting to the wire: Ours is 3”
Add this to the space between paintings that you chose at the beginning: 3 + 4 = 7)
Measure down 7” from the bottom of the upper piece. This is where you put the hook for the lower piece.

Theoretically, the center of the group should be at 60”:
 To hang the next set of paintings, measure the width of the next set: in our case we only have one painting, and it’s 20” wide.
Figure half of the width: 10”
Add this to the distance between that we established earlier: 10 + 8 = 18
Measure 18” from the edge of the widest piece in the first set.
Then measure up 67” (using the method we used earlier).
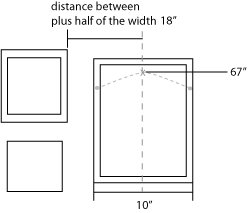 Then measure up 67” (using the method we used earlier).
Continue on for each set.
This method also works for diptychs, triptychs, and other multi-paneled works.
Lighting
Once the artwork is in place, adjust the lighting. Climb up the ladder and adjust the spotlights so that the lighting is even over each piece. Lighting will vary from space to space. Some galleries have better lighting than others.
Labels
Some galleries will provide you with numbers to put on the wall that correspond to a price list. If you’re doing it yourself, you might want to make some labels. I prefer the clear address labels that you can get at office supply stores.
Standard label text:
Name of Artist
Title
media
Example:
Joe Schmo
Landscape Masterpiece
oil on canvas
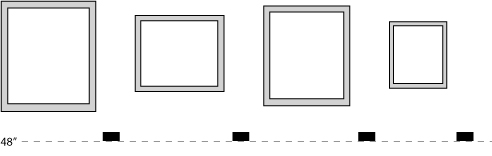
The placement of the labels should be consistent. Standard placement is on the right side of the piece, at 48”:
 Price List
Most galleries won’t put prices on the wall labels but will have a price list available for viewers to peruse on their own. Create a list that includes title, media, size, and price.
Example:
Landscape Masterpiece oil on canvas 24” x 36” $350
(note – size of artwork is generally listed height first - height" x width")
I hope this makes sense. It’s much easier to show someone how to do it than to try to write it all out.
If you have any questions, please leave a comment or email me at deanna at deannawood dot com
15 comments:
Hey, thanks; this is perfect timing, after just moving into a new place!
Hi .... this is a great post ... when I next post on mine I will put a link to it!
Thank you for taking the time to write it all out .... quite a labour, but very useful for others.
Does anyone have any suggestions for hanging artwork in a tent? I'm participating in an outdoor art festival and am trying to figure out how to hang my paintings. Thanks!
Erin Anne,
I've never done art festivals, so I'm not much help to you. A quick internet search didn't turn up much, either. Maybe someone will see your comment and post something.
For hanging work at tent shows or the like, I'd suggest investing in a couple of panels' worth of "gridwall"... upright partitions made of coated wire grid. That way you can use "s-hooks" to hang your work any way you wanted on the partitions, and fold the grids flat for storage when you're done. You can also get all kinds of shelves and bins and other accessories for displaying different types of work.
Try http://www.gridwall.com/ to start with. Hope it helps!
Great tips! Linda's blog led me here. May I have your permission to post the link to this on our art association blog?
www.rioranchoartassociation.blogspot.com
Here's how to reach me:
pmondoy@gmail.com
Thanks!
Paula
Amazing instructions all. Your diagrams were also really helpful. I'm an art student at the Art Center Design College, and while I have some experience hanging my own work, it's always good to see how other people do things. Thanks for the excellent pointers! :)
Thank you so much for these instructions! I'm having a solo show in October, but it's the first I've had to hang myself since my senior thesis in 1993. I have looked for instructions, but the ones I've found are very general. I know it must have taken you a while to organize and write all this, and I really appreciate it.
I do have a question, though. If you're not hanging salon style, is there a rule of thumb for how much space should be left between each piece? Framed sizes of my work run from 15 x 15 to about 26 x 32 or so.
I also would like to post a link to this helpful information!
Thanks again!
Sharmon,
Hmmm... I seem to have left that part out!
If you want to be really consistent, here's a good method:
1. lay out your pieces along your wall
2. measure the width of your wall
3. measure the widths of all your pieces and add them up
4. subtract that total from the wall measurement
5. divide that number by the total number of pieces + 1
6. that will give you the distance between pieces, as well as the distance on each side
Here's a simplified example:
- 7 pieces, each 20" wide
- the width of the wall is 200"
- the total width of my pieces is 140"
- 200 minus 140 = 60"
- 60 divided by 8 = 7.5"
- so you would have 7.5" on each side and between each piece
I hope that makes sense!
It helps if you draw it out first. The most confusing part of it, I think is adding 1 to your number of pieces.
Good luck!
Thanks, that does make sense. I was just wondering about how far apart they should normally be, as I need to tell the gallery exactly what pieces I'm bringing.
I tend to let the space dictate how far apart my pieces are, but I think it's just personal preference.
Happened on your website today and noticed that you had some advice on "hanging art." Thanks so much. I am brand new at this painting thing(now about 2 years) and have just decided to show my work for the first time (jikes) I have had no training at all and am just flying by the seat of my pants. My first little show is to be held Nov 13/14th and think of me that day TRYING to carry out your advice . I tried to link your website to my blog but not sure if it really happened.I just set up a blog about three weeks ago and am a real novice at all of this. Thanks again. Karin Lynn Cumming afreshexposure.blogspot.com/
Thank you very much. I am having my first show in a gallery. I'm very nervous and excited :)
Thanks. This has been extremely helpful.
Great post, thank you so much for th clear instructions and disagrams. Dawn
Post a Comment