My friend Trayc Claybrook has a website and a brand new blog, All Day Painter.
Show her some love.
She alerted me to this blog: Accidental Creative.
From their "about" section:
THE ACCIDENTAL CREATIVE CO. is committed to bringing creative freedom to the masses! It is the age of creativity, and “cover bands” don’t change the world. You MUST find your unique voice if you are going to thrive.
And for some holiday fun, here's an origami Christmas card generator.
Wednesday, December 20, 2006
Friday, December 15, 2006
Art Fairs
I've been reading lots of posts recapping the recent Art Basel art fair in Miami.
Joanne Mattera, Edward Winkleman, Robin Walker, and James Wolanin were all there and have interesting and varied takes on the experience.
From their descriptions, it sounds like a very fun but tiring few days - a series of huge trade shows that feature art, art, and more art. Apparently fairs are the big money making events for many galleries.
I'm curious to know if attending an art fair would be beneficial to an artist who doesn't have work in one of the featured galleries? I imagine that it could be a valuable networking experience for an emerging artist. You would get to meet people from many galleries and see the work first hand. You would also get to network with other artists.
I'm just wondering if I should try to go to Miami next year...
Sunday, December 10, 2006
Another vanity gallery
I got an email the other day from a gallery in Montreal offering me a show. At first I was excited, but then confused because I couldn't remember sending any proposals to any galleries in Canada. After reading further into the email, I realized that they were just trolling the web, looking for artists to invite to have shows in their space - charging them lots of money for the privilege, of course.
Here are some highlights from the email:
ATT: Deanna Wood
We have viewed your work and would like to offer you an opportunity for an exhibition of your work in Montreal, for the year 2007/2008. Please find below the "Terms and conditions".
Visit the gallery website for additional information: www.gallerygora.com
TERMS AND CONDITIONS
1. Eligibility and Application Procedure
Gallery Gora invites you to exhibit in a solo or in a group exhibition.
Selections are made solely on the basis of artists' portfolios.
Please send to the gallery:
- Completed and signed application (see page 4)
- International bank/postal money order or bank transfer (see
"deposit" paragraph 3)
You will then receive a confirmation, an exhibition date and other related information.
2. Duration of Exhibition
The exhibition runs for a minimum of 3 weeks (at least 19 opening days, not including setup and take down time).
3. Exhibition Fee
A - Solo Exhibition
- Each artist can have up to 20 pieces of work depending on size
- The fee for a solo exhibition is US $2,400.00 to cover gallery expenses
- The gallery takes a 10% commission during the 3 week exhibition
- A deposit (25% of the total fee) is paid together with the application.
- The balance of the fee is payable 5 weeks prior to the exhibition date. The deposit is refundable in full if Gallery Gora cancels the exhibition.
B - Group exhibition
- The fee to take part in a group exhibition is US $250.00 for first work and US $150.00 for each additional work.
- The number of artists in a group show depends on the total number of works. The width of each work should not exceed 4ft or it will be counted as two works.
Exhibition fees cover furthermore:
Advertising and public relations
- Mention of the show in all weekly newspaper arts calendars in Montreal (when possible)
- A press release including an invitation to the exhibition e-mailed to a list of contacts (over 10,000) 1 week prior to the opening. Our contacts include the press, curators, critics, dealers, consultants and corporations, as well as a larger body of public members and buyers. If artists supply us with additional e-mail lists, we will forward the invitation to these addresses as well.
- Full colour invitation cards. If we are provided with a postal mailing list of addresses within Canada, these cards will be sent out free of charge.
Other advertising options are available at extra cost (see application form)
Reception
- On the evening of the exhibition's opening, the gallery will welcome guests with wine and other beverages.
- Gallery staff will be at hand to receive visitors throughout the exhibition and to organize corporate/cultural events and receptions whenever possible, whether the artists choose or not to be present at the show.
4. Commissions
- Gallery Gora takes a 10% commission on sales during the 3 week exhibition.
- All money due will be sent to you within 10 days of the sale.
5. Shipping
Artists are responsible for all shipping fees and procedures to and from the gallery door.
Yikes! $2400! That seems crazy. But apparently artists are willing to pay. They have a ton of artists listed on their website.
I don't know. Maybe it's just me. Would you pay $2400, pay to ship your work, let them take a 10% commission on any sales, and then pay to ship the unsold work back to you?
Friday, December 08, 2006
Interested in the wholesale marketplace?
I received an email recently from Daniel Waldman from Buyer's Market of American Craft:
I wanted to let you know about our Visiting Artist (VA) program, which your readers may find interesting. The VA program offers artists the opportunity to explore the wholesale marketplace before taking the plunge as a wholesale exhibitor. We have a MySpace page here:
http://www.myspace.com/visitingartist
Our full program schedule can be found here:
http://www.buyersmarketonline.biz/viarpr.html
Check it out.
Monday, December 04, 2006
December exhibits
 Devour - collage, oil, and encaustic - 12" x 12"
Seeking Shelter - solo show at the Truckee Meadows Community College in Reno, Nevada
December 1, 2006 - January 30, 2007
 Take Shelter 4 - collage, oil, and encaustic - 6" x 6"
Small Packages - invitational group show at the Cumberland Gallery in Nashville, Tennessee
December 2 - December 23, 2006
I also have work at Town Center Fine Art in Watkinsville, Georgia.
If you make it to any of those places, please let me know!
Thursday, November 30, 2006
Packing and shipping artwork
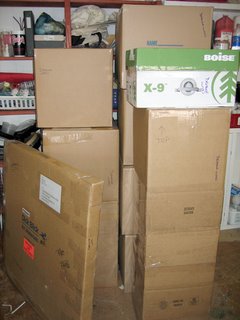 Packing artwork has been on my mind lately. I’ve spent the last couple of weekends packing up most of my work (10 boxes!) to ship off to a solo show at the Truckee Meadows Community College in Reno, Nevada. And I'm helping to make the boat payment for my local UPS Store owner...
I’m not an expert on packing and shipping artwork, but I have worked as a gallery assistant and I’ve unpacked artwork for a couple of national juried shows. So I do consider myself an expert on how NOT to pack and ship artwork. I have seen some amazingly stupidly packed boxes!
So I thought I would share some observations, tips, and techniques for packing and shipping that I’ve picked up over the years.
Reusable packing materials
First of all, if you’re shipping work that you know will be returned to you (a juried show, for example), then be sure to use easily reusable packing materials. Think about what it must be like at a juried show – there’s work coming in from all over the country, the people unpacking and repacking your work could be volunteers with little or no experience handling artwork – you want to make it as clear as possible for them to unpack your work and repack it after the show.
Avoid using packing peanuts. They’re not good protection because they can settle during shipping. They’re also a complete pain in the ass and gallery assistants hate them with a passion (at least my coworker and I did).
Clear instructions
It’s helpful to mark the spot on the box where you want it opened. As a gallery assistant, I LOVED the anal-retentive artists who sent unpacking and packing instructions (if you’re unpacking 50 boxes, you don’t want to have to think too hard about any of them). Just make it as easy as you possibly can. You don’t want the person who will be handling your artwork to be hating on you because you made her spend 20 minutes picking up peanuts or you wrapped something really tightly in so much bubble wrap that it won’t go back in the box later or realize that she opened the wrong end of the box and will have to spend extra time fixing it when she re-packs. Oh. Sorry. Flashbacks…
So when I pack something that is fairly complicated, I will include instructions. Pictures are also helpful, especially if the instructions are complicated.
Here’s an example of some instructions I wrote up for a fairly complicated package. I had 3 artist’s books in one box, and they had to be put back “just so” in order for them to fit. pdf file (120 KB)
Padding
Basically, you want to have as much protection between your artwork and the cold, cruel world as possible.
I pack my paintings in foam core boxes that I make myself. I then stack a few of those boxes inside a cardboard box. I line a larger box with foam and include the smaller box inside. So I basically have the paintings triple-boxed.
 a recent batch of foam core (and a few cardboard) inner boxes
Airfloat boxes
http://www.airfloatsys.com/
I’ve never used them myself, but I have unpacked quite a few. I think they’re fairly expensive, but they might be worth it for you.
The boxes are reinforced, easy to open, and re-usable. The boxes include 3 sheets of foam – one sheet protects your artwork on the bottom, one on the top, and you create a hole in the center piece of foam so that your piece fits snugly into it.
Crates
If you have tools and carpentry skills, you can make your own wooden crates. You can also have them made for you. Crates are expensive to ship because they’re usually heavy, but they can be good protection for your artwork, especially sculpture.
If you use a crate, be sure to mark very clearly which screws should be removed to open the crate.
To sum up, here is a basic list of packing tips that I created for local juried show participants:
Protect the artwork from dust and moisture:
- Wrap the artwork with protective, acid-free paper such as glassine or tissue paper
- Cover the artwork with white cotton fabric (recommended for textiles, ceramics, and wood)
- Wrap the artwork loosely in plastic
Protect the artwork from damage:
- If possible, use two containers; a smaller box cushioned on all sides inside a larger box can protect your artwork from bumps and sharp objects
- Insulate the artwork with padding such as bubble wrap, upholstery foam, or Styrofoam. NOT recommended: loose material such as any type of Styrofoam peanuts.
Identify your artwork:
- Include the artist’s name and the title on the back or bottom of the artwork
- Write your name on all exterior sides of all shipping containers using permanent marker
- Cover any paper labels with clear tape
- Identify your container as “FRAGILE” (ask your shipping company for labels)
- Identify where you would like the container to be opened by writing “OPEN THIS SIDE,” or “OPEN HERE”
- Include detailed unpacking and packing instructions
Resources:
http://www.airfloatsys.com/ - inexpensive, re-usable packaging solutions for shipping fine art
http://www.lightimpressionsdirect.com/ - archival materials
http://www.uline.com/ - boxes and plastic bags
Update:
For textile artists, check out Lisa Call's post where she explains how she ships large quilts.
Thursday, November 23, 2006
Thankful.
I'm feeling reflective this Thanksgiving - I know I complain about a lot of things, but I know that I'm very lucky and I'm thankful for:
Sam - he makes me laugh every day and makes me realize what's important.
Family - I know they would do anything for me.
Friends - who have supported me and encouraged me and listened to me and laughed at my stupid jokes.
Health - something we all take for granted.
Art - it's allowed me to meet so many talented and creative and nice people.
I'm counting my blessings. I hope you have a wonderful and safe Thanksgiving!
Tuesday, October 31, 2006
Alternative exhibition spaces
Most artists strive for commercial acceptance and success. There are several paths to achieving those (often elusive) goals, commercial galleries being one of them. But if you’re having difficulty breaking into a commercial gallery or if you feel you might not be ready for one yet, there are many alternative spaces that you may want to consider.
I have to admit that I live in a town with two universities and a thriving art scene, so you can hardly go anywhere around here without seeing artwork from local artists and art students. But I’m sure you can find similar venues in your town.
I'm not going to cover rental galleries, vanity galleries, and community art centers. I'm going to focus on free spaces that might not currently exhibit art.
Some of these alternative spaces include:
Libraries
Cafes/restaurants
Coffee shops
Wine shops
Hair salons/spas
Fitness clubs/dojos
Dance studios
Record stores
Bank lobbies
Churches
Basically, any wall is a potential exhibition space.
Do some research. Visit different businesses in your town and notice if they have artwork hanging in their space. If they have changing exhibits, ask to speak to the person in charge of the artwork. Ask him or her about submission guidelines – would they like to see slides or a CD, view your website, or see actual work?
Carry a packet of information (or brochure or business card or CD) around with you to leave behind if the opportunity arises.
Approach businesses or spaces that relate to your work.
If you paint floral still lifes, you might approach a flower shop, garden shop, or a botanical garden. Figurative work might lend itself to a day spa. Landscapes from your trip to Italy would look great in that little Italian restaurant. Asian-inspired work might appeal to the owners of a dojo or karate school. Photographs of dancers in a dance studio. Watercolors of historic missions in your local Catholic church. You get the idea…
Some businesses that currently exhibit artwork from local artists might also already do receptions. If they don’t, you might brainstorm about how to do your own reception. They might be open to live music, jugglers, dancers, etc. Try to find something that would be mutually beneficial to both of you – getting your work seen and bringing in customers to the restaurant or shop.
Unused and empty retail spaces
Consider approaching the owner of a vacant space that would lend itself to your work. Maybe there’s an empty store on your town square that you could borrow or rent fairly cheaply for a couple of weeks. You would need to consider how to staff the space – posting specific gallery hours and having someone work as a gallery sitter.
Houses
A couple of years ago I went to a show at a gallery space that was actually a house. A couple of art students were renting a house and realized that they had a room that they weren’t using. They emptied out that room as well as their living room. Then they invited artists to have short (usually one or two-day) shows. They also knew music students and invited them to provide music for the reception/parties.
Things to consider
Trust your instincts.
If a restaurant owner seems shady or untrustworthy, tell them thanks anyway. Work out the details of sales – if they handle sales then usually they will take a commission. If they don’t want to deal with sales, they might have interested patrons contact you directly.
Find out what the venue will provide.
Some restaurants or shops might already have receptions and PR in place. You can just hang your show and show up for the reception. But others might leave that all up to you. If so, then you'll need to decide how you want to market the show. Consider writing a press release and sending out postcards to promote the show.
Be sure to have contact info available during your show.
Frame and hang an artist’s statement. Leave a stack of business cards or brochures.
It may be a great opportunity to show, but not sell.
If you look at it as a way to show your work to people who wouldn’t normally see it, then you’ll have a good experience. If you expect to sell every piece, then you might be disappointed.
Strength in numbers.
Enlist a group of artists to have a show with you. Find artists who do work in a similar theme, similar format, similar medium, etc. Having a group and assigning tasks helps to alleviate the work load associated with mounting a show.
What are some other alternative spaces that you’ve exhibited in? Were they successful? What did you do to make them successful?
Wednesday, October 18, 2006
MOO cards
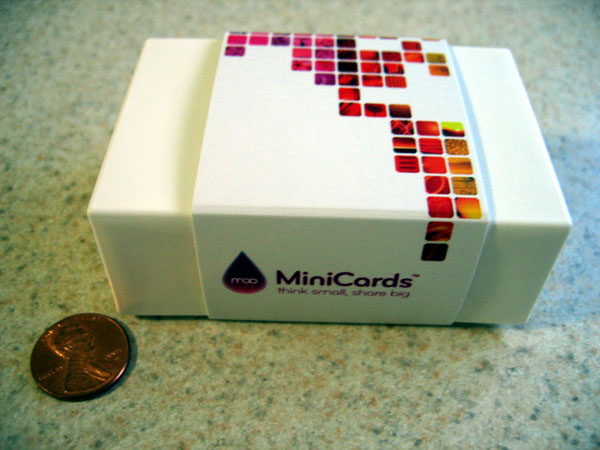 My little box of MOO MiniCards was waiting for me in the mailbox today! I'm very excited. They're so cute!
They're packaged in a cute little box with a sleeve. Inside are 100, 2 3/4" x 1 1/8" cards - less than half the size of a standard business card.
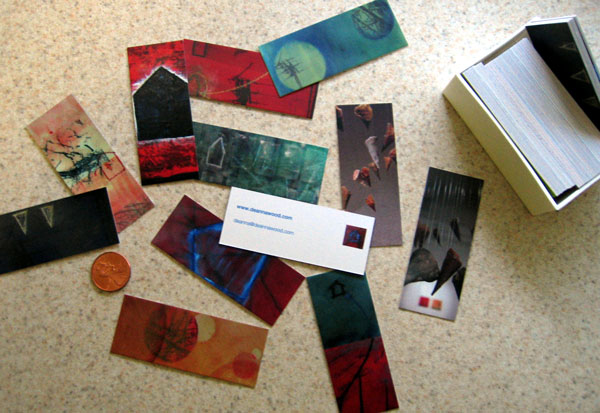 The images on the backs can be all different (I think I got 3 of each of mine) - you can get 100 different images. This is what's so exciting to me. Maybe I'm easily amused?
 You can put up to 4 lines of information on the front and you have a limited choice of fonts and colors.
They take your images from your flickr page, so you have to have a flickr account (they're free). You can select the images you want to use and select the areas that you want to print. Most of my paintings are square, so the format was a little odd - most of my cards ended up being essentially details of paintings.
You also need to make sure that you upload higher-res images than you normally would. They recommend 640 x 480. A couple of mine were only 300 x 300 and they turned out fine, though.
Oh, and I guess they were fairly pricey for only 100 cards ($19.99), but you can get 100 different images, for cryin' out loud! How cool is that? And did I mention that they're super cute?
Check 'em out!
www.moo.com
www.flickr.com
Friday, October 13, 2006
Submission Guidelines
A bit of a diversion...
Everything about McSweeney's is great. Especially today's Submission Guidelines for Our Refrigerator Door.
An excerpt:
We are no longer accepting robot-monkey-themed work, be they drawings, stories, or whatever. We've had it up to here with robot monkeys. Yes, robot monkeys are "funny" and "cool" and they make "amazing" beeping sounds, but enough is enough with the robot monkeys. Robot monkeys are so last July. And no saying that something is a tree and then later telling us it's a robot monkey. That will lead to immediate removal from our refrigerator door, and no amount of crying and spinning wildly on the floor will make us put it back up.
Check it out!
Wednesday, October 11, 2006
Taxes
Math, accounting, record keeping, and taxes. I know. Yuck. Most artists hate all of this, but it’s important that you understand at least some of the issues so that you’re not paying too much - or (maybe) worse, not paying enough - which could result in an audit, fines, and penalties.
A few years ago, when I set a goal to make a living as an artist, I decided that I would keep track of my expenses and income. Partly as a psychological boost – to show that I was serious about being an artist.
Recently my local art group, VAST invited an accountant to talk to the group about tax issues for artists. I wanted to let you know what he said and give you some basic ideas to get started on your record keeping. I want to stress that he was talking specifically about issues related to artists in Texas, and he was just answering general questions. So if you need to know something specific to your situation, please contact an accountant in your area.
So here are some of the things he suggested:
Get a separate bank account for your art business
This helps simplify record keeping. Pay for your supplies out of this account and deposit your income from art sales, teaching, commissions, etc. into this account.
Avoid using a debit or credit card
People tend to spend more when using plastic as opposed to cash or checks.
Keep good records with financial software (like Quicken)
It’s easy to use and you can set up categories like art supplies, meals and entertainment, travel, education, etc.
Tax exempt status
Use tax exempt status to buy consumable items such as paint, paper, canvas, wood (anything that becomes part of your artwork). You have to pay tax on things you use but keep, such as brushes, tools, easels, tables, etc.
Forming a corporation doesn’t usually benefit you
Until you’re making $30K or $40K per year.
Mileage
You can claim mileage but you must keep accurate records. The going rate right now is 44.5 cents/mile. You can keep a notebook in your car and jot down your odometer readings every time you drive to your studio, to meet a client, visit a gallery, etc. It has to be business-related.
You’re responsible for sales tax on your artwork
If you’re not charging your customers sales tax, then you have to pay it. Most gallery owners will take care of the sales tax, so sales through a gallery usually aren’t a problem. But when you’re selling at an art fair or out of your studio, you need to be charging tax. This is a subject that I’m not really clear on, so definitely consult a professional.
Studio space
It’s best if your studio is a separate structure that is solely dedicated to your business, but you can also get a deduction for studio space within your home. The benefit to claiming an in-home studio is that you can claim mileage on any trips you take away from your studio on business. The example he gave was a musician – if the musician travels to different locations to perform or give lessons, he/she can’t deduct the mileage. But if he/she has a separate studio (even just a section of a bedroom), then any trips away from the studio are deductible. Presumably you can deduct rent, utilities, etc. You definitely want to consult a professional on this question…
Hopefully some of these tips will help you – or at least alert you to things you may need to look into.
Here are some resources with more information:
NYFA article on taxes
Lots of articles from All Creative Portfolios
The Artist Help Network has a listing of helpful books
Volunteer Lawyers for the Arts has lots of info
Friday, October 06, 2006
Group Show at exploding head gallery

My work is part of a group show called Architectural Forms at exploding head gallery in Sacramento, California.
The show runs until October 28th. The reception is October 14th from 6-9 pm.
If you're in the area, check it out!
Wednesday, October 04, 2006
Postcards
Postcards are a great way to advertise an upcoming show. They’re also great to have later, to tuck into your packets that you send to galleries. If you’re having a show in a commercial gallery, art center or university gallery, most likely they will design the postcards and have them printed. They will probably give you a small number that you can mail to select people on your mailing list.
But if you’re organizing your own show (in an alternative space, rental gallery, student gallery, etc.), then you’ll probably be on your own to design and print your postcards.
Steps to creating an effective postcard
1. Put a striking image on the front
Start with a great photograph or slide of your work. Pick the best piece from your show and get a great shot of it. An intriguing detail shot can be interesting and mysterious. If you don’t have a good camera or you lack photography skills, hire a professional photographer to shoot it for you.
It’s important to start with a good quality, high-resolution photograph (slide or digital). If you attempt to print from a 72 dpi jpg, you’ll get jagged, fuzzy, ugly results.
It's also a good idea to put your name on the front.
2. Include all important information on the back
I can’t count the occasions where I’ve gotten postcards for art shows that left out something crucial – like the artist’s name, the dates of the show, location, etc.
What you should include:
Your name (preferably on both sides)
Title of the show
Location
Date (including the year)
Gallery hours
Reception date, if there is one
Information about the work you featured on the front of the card (title, medium, size)
Return address (the post office will return any with bad addresses – important to be able to keep your mailing list current)
Your website url
All of this information should be clean and easy to read. Don’t use funky fonts here. The title and your name can be in a larger size and bold, and possibly in a different (but not too different) font. Try to limit yourself to 2 or 3 sizes and no more than 2 different fonts. Don’t use any sizes below 8 point.
I don’t think there’s any reason to use color on the back of a postcard. Seems like a waste of money to me. Black ink is effective and readable.
Here’s an example:

3. Follow postal guidelines
The post office won’t mail anything below a certain size (3.5” x 5”) and there’s a maximum size for mailing at the postcard rate (4.25” x 6”).
Size guidelines: http://pe.usps.gov/text/qsg300/Q201.htm
There are also certain areas that the post office designates for printing their own barcodes, etc. In the example above, the grey areas are off-limits for text or graphics. The white area is free.
Printing your own
If you’re having a smaller show, or just want to limit your mailing, it’s possible to create your own postcards on your computer and print them yourself at your local copy shop.
The easiest way to do this is to lay out your postcards 4-up on a page, copy them, and have the copy shop cut them for you.
The resulting postcards will be 4.25” x 5.5” – a little under the standard postcard size (4.25” x 6”), but still within the accepted size for the post office.
You’ll need a decent illustration or page layout program such as Illustrator, FreeHand, InDesign, or Quark – even Photoshop, in a pinch. I wouldn’t recommend designing them in Microsoft Word (shudder) or PowerPoint (cringe) unless that was your absolute only choice.
Enlist the help of a graphic designer if you don’t feel that you can do it yourself. Your local copy shop probably offers this service.
Professional printing
For slick, colorful, glossy, professional results, get your cards printed by a commercial printer. If you know and trust a local print shop, then use them.
Most artists use a company called Modern Postcard. They’re great quality and pretty quick. You can get 500 4.25” x 6” postcards for $129 plus shipping.
You can design your own and send it to them or send them all your info and they’ll do it for you (but I think it costs a little bit more).
If you don’t need 500 postcards, check out Overnight Prints. I recently discovered them and they’re my new favorite. Their shortest run is 250 (a much more manageable quantity - for me, at least). I recently got 250 postcards for around $50 (including shipping).
They work the same as Modern Postcard – send them a file or have them create the postcard for you.
Both companies have templates in different programs that you can download. They also offer design advice and will show you examples of good and bad postcards. If you intend to design your postcards yourself, be sure to follow their guidelines (file formats, software programs, dpi, cmyk, bleeds, etc).
The postcards are printed in big batches (they’ll gang 20 or so different postcards onto one sheet), so it’s possible that the quality (especially color) can suffer. I’ve always gotten good results, though.
I would recommend getting your postcards professionally printed as opposed to running copies. The main advantage is that they look much more professional. A disadvantage is that you will be stuck with a bunch of leftover cards.
You can extend the life of a card by leaving the back blank. You can print your specific show information on a sticker and adhere it to the back before you send it. As long as the image on the front is not too specific and will represent your work for a couple of years, this is a good strategy. You can even use them as regular postcards, thank you notes, etc.
Useful beyond the show
I have quite a few postcards left over from past shows. I send them out with my marketing packets, leave them out for people to pick up at shows and at my studio, and hand them out to people every now and then. They’re a great marketing tool.
Sunday, October 01, 2006
My process
Tracy Helgeson, one of the wonderful new bloggers that I've discovered lately has been using her blog to document her painting process. I find it intriguing to see the different stages that a work of art goes through.
With that in mind, I'd like to share a bit of my process.
For the last 2 years, I've been working exclusively with the encaustic process. I create what is called wax medium by melting beeswax and adding damar crystals - a natrual resin that damar varnish is made from. The resin raises the melting temperature of the wax and makes it a little more durable.
I will often use the medium without adding any pigment, brushing it over collage elements and then working back into the wax - scraping, scratching, adding oil paint, oil pastel, more collage with tissue paper, objects, etc.
But sometimes I will create what is called encaustic paint. You can buy encaustic paint in hundreds of colors, but I like to create my own by adding oil paint. This method is usually not as opaque and bright as the prepared paints, but I prefer more transparency, so it works for me. Oh, and I'm also really cheap - the encaustic paints are a little pricey. :-)
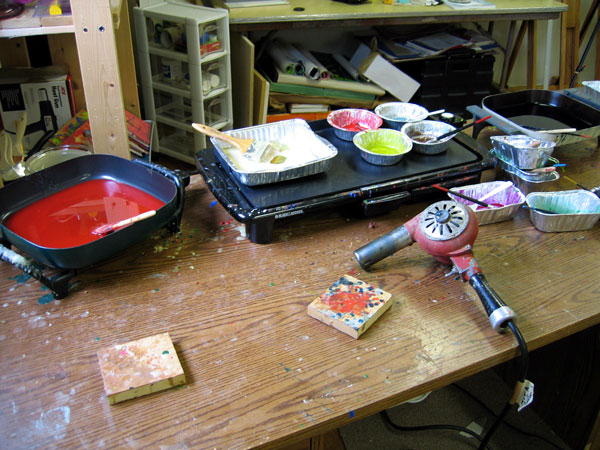
 Here's a photo of my studio. Note the fan in the window - this helps to draw out harmful fumes from the wax. It's a bit ghetto - just a bathroom exhaust fan in a piece of scrap wood - but it works.
I melt my wax in electric skillets and mix paint into small tins that I keep hot on a pancake griddle.
 I use a heat gun (that scary hair-dryer-looking thing) to fuse the wax to the surface and to each layer of wax that I add.
I normally start with a prepared board - I love the Ampersand "Cradled Hardbord" boards, but sometimes I can't find a good price. I will often buy the "Gessobord" boards and cover them with paper in order to make them compatible with encaustic (wax has to have something absorbent to adhere to, so it's not recommended that you apply encaustic over acrylic, glass, plastic, metal, etc. - although you see people doing it all the time).
 So this is a Gessobord with paper glued onto the gessoed surface. I use Yes glue, which is a great glue for collage. I put something heavy on it and let it sit over night. I drew some state border lines with oil pastel - you can't really see it in this photo...
 I then painted on some tinted encaustic paint and then fused it with the heat gun. I was going for a bit of a blended look, much like the colors on the weather radar.
 I then scribed some circular shapes into the wax surface.
 The detail shows the circles...
 Rotation 1 - 12" x 12" - collage, oil pastel, and encaustic on panel
The finished piece - I rubbed oil pastel into the lines of the circles.
I was influenced by the weather radar when a big storm was blowing through the Dallas area. I was intrigued by the circles that kind of pulsated, indicating rotation in the storm (and a possible tornado). I don't know if that's a new development in radar technology, but I had never noticed it before.
 So while my son and I were cowering in the hallway, listening to KNTU, I was thinking about this painting. Well, mostly I was saying, "No, there's probably not a tornado. They're just being safe..." But in the back of my mind...
With that in mind, I'd like to share a bit of my process.
For the last 2 years, I've been working exclusively with the encaustic process. I create what is called wax medium by melting beeswax and adding damar crystals - a natrual resin that damar varnish is made from. The resin raises the melting temperature of the wax and makes it a little more durable.
I will often use the medium without adding any pigment, brushing it over collage elements and then working back into the wax - scraping, scratching, adding oil paint, oil pastel, more collage with tissue paper, objects, etc.
But sometimes I will create what is called encaustic paint. You can buy encaustic paint in hundreds of colors, but I like to create my own by adding oil paint. This method is usually not as opaque and bright as the prepared paints, but I prefer more transparency, so it works for me. Oh, and I'm also really cheap - the encaustic paints are a little pricey. :-)
 Here's a photo of my studio. Note the fan in the window - this helps to draw out harmful fumes from the wax. It's a bit ghetto - just a bathroom exhaust fan in a piece of scrap wood - but it works.
I melt my wax in electric skillets and mix paint into small tins that I keep hot on a pancake griddle.
 I use a heat gun (that scary hair-dryer-looking thing) to fuse the wax to the surface and to each layer of wax that I add.
I normally start with a prepared board - I love the Ampersand "Cradled Hardbord" boards, but sometimes I can't find a good price. I will often buy the "Gessobord" boards and cover them with paper in order to make them compatible with encaustic (wax has to have something absorbent to adhere to, so it's not recommended that you apply encaustic over acrylic, glass, plastic, metal, etc. - although you see people doing it all the time).
 So this is a Gessobord with paper glued onto the gessoed surface. I use Yes glue, which is a great glue for collage. I put something heavy on it and let it sit over night. I drew some state border lines with oil pastel - you can't really see it in this photo...
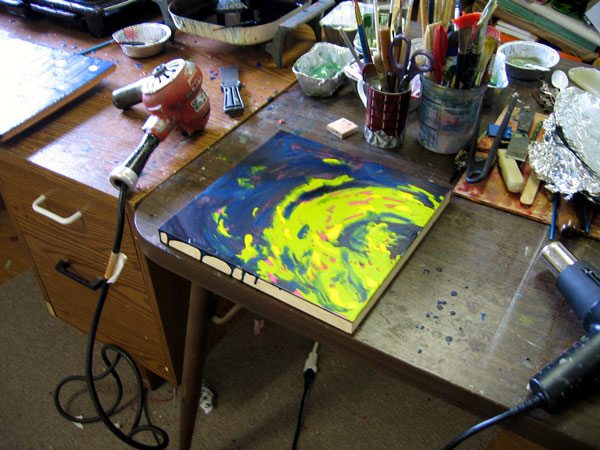 I then painted on some tinted encaustic paint and then fused it with the heat gun. I was going for a bit of a blended look, much like the colors on the weather radar.
 I then scribed some circular shapes into the wax surface.
 The detail shows the circles...
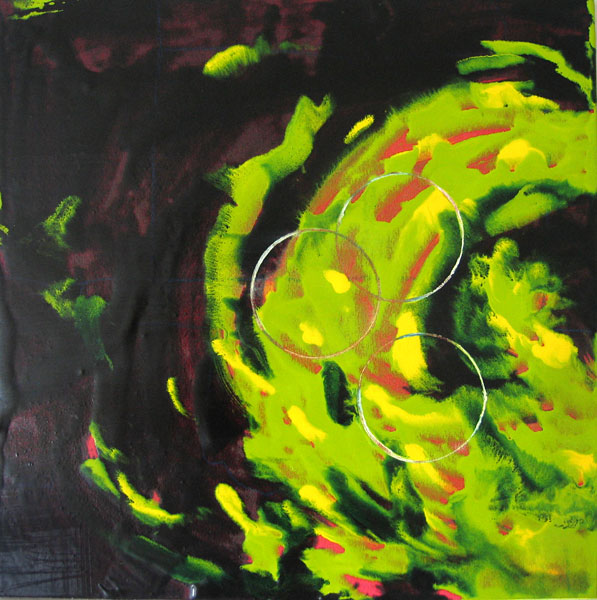 Rotation 1 - 12" x 12" - collage, oil pastel, and encaustic on panel
The finished piece - I rubbed oil pastel into the lines of the circles.
I was influenced by the weather radar when a big storm was blowing through the Dallas area. I was intrigued by the circles that kind of pulsated, indicating rotation in the storm (and a possible tornado). I don't know if that's a new development in radar technology, but I had never noticed it before.
 So while my son and I were cowering in the hallway, listening to KNTU, I was thinking about this painting. Well, mostly I was saying, "No, there's probably not a tornado. They're just being safe..." But in the back of my mind...
Friday, September 29, 2006
What is an emerging artist?
In response to my comment on Tracy’s blog, Karen wondered about the term "emerging artist."
It’s an ambiguous term that generally means an artist who’s just beginning his or her career.
When I see descriptions of galleries, they usually indicate the types of artists they represent (landscape, abstract, Russian, African-American, etc.) and also what career stage (emerging, mid-career, or established). At this point, I would never submit my work to a gallery that only represented mid-career and/or established artists.
So here’s what “emerging artist” means to me:
No longer a student.
Had a few solo shows and/or asked to be in some invitational shows.
Serious about his or her art - may not be a full-time artist but considers him or herself an artist and actively creates and markets the work.
Hasn’t had a museum show.
Isn’t necessarily in a lot of public or private collections.
But I have no idea how long you have to work as an “emerging artist” in order to go on to the next stage. Maybe after you’ve been working for 20 years you can consider yourself mid-career? Or after you have your first museum show? Or when Art Forum writes an article about you?
Do you consider yourself “emerging?” Why? If not, why not?
Wednesday, September 27, 2006
Self Doubt
I'm always worried when I send my paintings out into the world. I'm afraid that when someone sees them in person, they'll be disappointed. Perhaps a gallery owner will like the images on my website but when they see the actual paintings, they'll say, "Ick. What was I thinking?"
But that's what it's all about, really. You do your best to create your work and then when it's out of your hands it has a life of its own. There's always that risk that you'll get negative feedback or criticism. I suppose if you weren't willing to risk it, you'd just hide your paintings in a closet.
I sent some paintings off to a gallery earlier this week and have been having those secret worries and fears. The gallery owner sent me an email that said, "I received your paintings this morning and I'm thrilled. They are everything I hoped they would be."
How cool is that?
Tuesday, September 26, 2006
Art Biz Blog
Thanks to Alyson Stanfield at the Art Biz Blog for mentioning this blog!
I just recently discovered her blog - tons of great information there. For some reason I've been on an "inspiration" kick lately - looking for information on how to stay inspired. Alyson has a bunch of great posts on inspiration. Be sure to check it out!
I just recently discovered her blog - tons of great information there. For some reason I've been on an "inspiration" kick lately - looking for information on how to stay inspired. Alyson has a bunch of great posts on inspiration. Be sure to check it out!
Friday, September 22, 2006
More Resources
I think I forgot to mention a really useful book - The Practical Handbook for the Emerging Artist by Margaret R. Lazzari. It was a required book for the professional practices class that I took in grad school.
You'll find lots of information on getting your work out, making contacts, finding alternative exhibition spaces, documenting your work, researching galleries, and curating shows. There are even several interviews with artists. A great resource.
Alyson B. Stanfield at the Art Biz Blog posts lots of great information for emerging artists. Great stuff about pricing, getting into galleries, marketing, etc.
I just happened upon this website for the University of Texas at Austin's Fine Art Career Services. It's primarily for students and recent graduates of UT, but anyone can access the information. There's information on finding a job or internship, writing a CV, and there's even a Career Guide for Studio Art Majors (pdf file).
If you're a crafter or are thinking about starting a craft business, Make It is a great blog. Find information on where to sell your craft items, get organized, find inspiration, etc.
Please post any other resources that I might not have mentioned!
Tuesday, September 19, 2006
Progress Report
I've been OCD lately and I've compiled a list of the galleries that I've sent my brochure to. These were mostly galleries that I researched from the Art in America Gallery Guide. I've been wondering how many I mailed out and how many responded...
Starting in April of 2005, I sent my brochure and cover letter to 168 galleries from Arizona to Wisconsin.
Rejection
As of September, 2006, I've received 39 rejection letters (some form letters, some hand-written notes, and a few with valuable feedback).
Acceptance
I've received interest from 5 galleries for possible group shows in the future.
A gallery invited me to participate in a group show.
I received gallery representation and that gallery recently sold two of my paintings. That paid for my brochure printing and postage right there...
Consultants
Three months ago, I sent my brochure, cover letter, and CD to 15 consultants (also from the Art in America Gallery Guide). I've only received one letter - a rejection... It's still fairly soon, though.
Thoughts
It was interesting to look back through the rejection letters. I so appreciate the people who took the time to write a note or give specific feedback, although after a while, I was happy to even get a form rejection letter. Well, not happy, but you know what I mean...
Next steps
I still have a list of galleries that had specific submission guidelines. I'm going to double check their websites one more time (to make sure they're still accepting submissions) and send them packets. I was specifically looking for galleries that would accept CDs. I haven't taken slides in a while - I document my work digitally now. Anyway, slides are just too dang expensive to send out to just sit on somebody's desk for six months.
I'm going to add all of the galleries that sent me rejection letters to my mailing list. Many of them specifically said, "Keep us on your mailing list," or "We'd like to see your work in the future." So who knows? Maybe someone who rejected me last year will like my work next year...
Tuesday, September 12, 2006
Types of Galleries
When I decided that I was ready to let my work loose on the world, I looked around for advice in books, from teachers, and from other artists. I heard:
“Get your work out there.”
“Show wherever you can.”
“Get shows on your resume.”
“New York! It’s so important to get a show in New York!”
So I read Art Deadlines List, Art Calendar, and surfed all the art opps boards I could find. I entered a ton of juried shows, especially the ones in New York and the ones with big-time New York critics and curators as jurors.
That particular year, I think I got into a couple of shows - none of the New York ones, though. But I did receive an interesting letter from one of the galleries there that had sponsored one of the shows I entered. It said something like, “The juror rejected your work, but we really like it. We would like to invite you to join our gallery.” It proceeded to recommend the gallery and the advantages of being able to show in New York, etc. There were different levels at which I could “join,” and which would allow me different amounts of wall space in upcoming group shows. They said that they advertised in prominent art publications, promote their artists, yadda yadda yadda. It all sounded really nice until I saw the price list of the membership levels. I think the cheapest one was still over $2000. That’s a lot to pay for a line on your resume.
Vanity Galleries
One of my professors looked over the letter and told me that the gallery was what is known as a “vanity gallery.” She explained to me that the problem with vanity galleries is that most of them have a reputation as just that - a gallery in which someone has paid to show their work just to get New York on his or her resume. For the most part, vanity galleries don’t promote and develop relationships with artists like reputable commercial galleries do. And it won’t necessarily impress a gallery director if he or she sees it on your resume.
Rental Galleries
Rental galleries are a little different. Although they might not have the same prestige that a commercial gallery or an alternative space might have, they are definitely a viable place to show your work, especially if you’re just starting out and need experience showing.
Most rental galleries charge a flat rate for a specific period of time, say $200 for 3 weeks. It will most likely be a “do it yourself” type of operation. You hang the artwork, design the invitations, do the PR, schedule and host the reception, and sometimes you might even have to staff the gallery.
This is great experience for someone starting out or for a group of artists who want to show together but might not have another venue available.
Obviously you’ll want to find a gallery near your home, especially if gallery-sitting is involved.
Co-op Galleries
Co-op galleries are different still. A co-op gallery usually involves a group of artists who work together to show their work, promote the gallery, and sometimes offer community art classes or workshops. Some co-op galleries will even have studio space available for their members to create artwork on site.
The co-op gallery will require a membership fee, which will go towards gallery maintenance, rent, promotion, etc. You may have to pay a commission to the gallery as well, upon the sale of your artwork.
The main difference between a vanity gallery and a co-op gallery is that the artists in the co-op are invested in the running of the gallery. This can also be a great way to get experience with shows, to meet other artists, critics, curators, etc.
You’ll most likely want to be as involved as you can, so being physically close to the gallery will be important.
I have had good experiences with rental and co-op galleries, but I’m trying to stay away from the vanity galleries...
Monday, September 04, 2006
Interview: Michelle Caplan
 work by Michelle Caplan
I thought it would be interesting to hear from some artists who are already established - to find out how they got their start, how they stay inspired, and ask them to share some advice to help us along.
I contacted Michelle Caplan, an artist with a background in graphic design, who creates beautiful work from found photographs and other ephemera. She was kind enough to answer a few questions via email:
How did you get your start in art?
I have been doing some kind of art ever since I can remember. I was very fortunate to have many creative people around me growing up and they definitely made an impression. I would draw, paint t-shirts, bedazzle, collage, write, make jewelry, and on and on. I always gravitated toward anything creative.
When did you decide that you were ready to put your work out to the world?
I was freelancing from home, doing Graphic Design, and started doing the art as a side thing. I never thought I could be a full time artist. I was getting more and more commission inquiries, and slowly but surely I started exploring ways to sell my work online. I tried ebay for a while and was selling pretty well. Then I discovered blogging and Etsy, and my participation in sharing my work has just grown from there. I never made a conscious decision that I would reveal myself to the world. I have just gradually become more and more involved.
What was your first step in marketing your artwork?
Clear photography!!! The biggest mistake I see artists and crafters make is that they put lo-resolution images on the web. I am always astounded when people do this. We are all very visual and if your images aren't clear and crisp, no one is going to invest any time in delving deeper. You have to put your best foot forward online because losing a potential clients attention is always a click away!
What has been the most successful (in terms of marketing)?
My blogs, by far, have been my best tool. I get to express myself, and share my inspirations.
What hasn’t worked so well (in terms of marketing)?
I have to say that so far nothing has been a dismal failure.
How do you price your work?
Before I started working with galleries, I priced my work based on a few things. I used to sell my work on ebay, and that was a great gauge but I also look at how are other artists pricing their work, and how established they were. Now I have to be more aware of pricing because of gallery representation. My prices have to be uniform across the board so that is a bit harder. As artists we know what we would be happy selling a piece for. I try to make sure that I am supporting myself while still remaining affordable.
Do you create art full time?
Yes. All day, everyday. And twice on Sundays.
What are your current art goals?
To keep pushing forward the best way I know how. Keep my head up and get into a few more galleries. I am also doing a bunch of fairs in the Fall. I need more face to face time with people. Because my work is a bit different, it takes people seeing it in person for the first time a minute or two, to get it. I love the look in their eyes when it clicks, and then the questions that follow are always insightful and great.
What is your advice to emerging artists?
We all encounter rejection along the way. You have to never give up. Never stop pushing forward and never stop believing.
--------------------------
Check out Michelle’s beautiful work here:
http://www.etsy.com/shop.php?user_id=17697
http://michellecaplan.30art.com/
Wednesday, August 30, 2006
Writing an Artist’s Statement
If you’re an artist, chances are someone has said, “What is your painting about?” or, “Explain this photograph to me,” or, “What the hell is that brown thing?”
It’s human nature to try to make sense of what we see. Writing an artist’s statement is a great way to help your viewers understand what they’re seeing. Even if you never share your written statement with anyone, just taking the time to sit down and write it out will help you talk about your work more easily.
Keep it (fairly) short
Write enough so that you can get your ideas across, but keep it to one page or less. Nobody wants to read a multi-paged artist’s statement. That’s what manifestos are for. Conversely, you might think your one-sentence artist’s statement (“I paint landscapes that are pretty”) is funny and ironic, but you might also come across as a gi-normous smart-ass.
Keep it simple
Avoid academic or flowery language. Even if you’re in grad school, your viewers will most likely include some non-artists and non-academics, so you don’t want to alienate them with sentences like, “I find this work menacing because of the way the subaqueous qualities of the figurative-narrative line-space matrix threatens to penetrate the essentially transitional quality.”*
I know. I read New American Paintings. That’s the way everybody in grad school (or who’s been to grad school) writes artist’s statements. Well, it’s just wrong. Don’t do it. Save all those big words for your prospectus or the paper you're going to present at CAA. They live for that.
Where to start
Think about a painting, photograph, or exhibit that you’ve seen that you loved, hated, or didn’t understand. What did you want to know about it? Did you wonder what materials the artist used? Why did she paint clowns? Why were the clowns so scary? Was the artist traumatized by a clown? How did she decide to combine photographs and painting? What is her process? Etc…
Then think about a time when someone was viewing your work and asking you questions. What did they want to know? What were they most curious about?
When I wrote my very first artist’s statement, I sat down and just imagined that I was talking to a non-artist friend about my work.
It's also really helpful to collect artist's statements when you go to shows. Or surf the internet and read the statements on artists' websites. You'll see examples of both good and bad statements. Be inspired by the good ones and know that you can do much better than the bad ones.
Start with the “Why?”
Why did you choose your particular subject matter or imagery? You can mention influences (artistic or otherwise), inspirations, and past experiences that led you to your subject. Some artists often refer to the work of other artists that inspired them. Others might be influenced by media or popular culture. Still others might have been traumatized by clowns… It doesn’t really matter how you came to your subject matter, but the viewer will be interested in knowing why you chose it.
Then talk about the “How?”
Most viewers will want to know something about your materials or your process, especially if the materials or processes are unusual. It’s not necessary to write a step-by-step guide to the watercolor process, or list every chemical that you used to process your photographs. You might just mention that you use watercolors and that you were drawn to them for their unpredictable nature and their transparency. Or you could briefly describe the process used to create cyanotypes and what made you love it. And if there’s an unusual technique or material, mention that. And seriously, what is that brown thing?
Act like you know what you’re doing
Avoid phrases like, “I want to…” or, “I’m trying to…” or, “My intention is…” Just say what you’re doing: “I expose the gritty underbelly of urban life…” or, “These paintings explore the wonders of nature and the beauty of our world…” Don't be wishy-washy about it.
Not so much “me,” “my,” and “I”
It’s hard to do, but try to avoid using the words “me, my, and I,” repeatedly. It’s annoying to read a whole page of sentences that start with “I.”
Update it
If you’re a working artist (creating new work often) then you’ll need to look at your statement every now and then to make sure that it still reflects your current work. A good rule of thumb is to update it every time you ship work off to a show. This keeps the statement fresh and helps you to prepare to talk about your work.
Multiple statements
Most artists only have one statement that they update every few months or as their work changes. You might have multiple bodies of work that require different statements, especially if you work in different mediums.
It’s so useful
Once you have a good artist’s statement, it will come in so handy in so many different ways:
1. Writing it will prepare you to talk about your work in formal or informal settings.
2. Frame it and hang it on the wall near your artwork to explain the work when you’re not there.
3. Use it as a basis for a press release when you’re promoting your show.
4. A reporter might use it to write a story about your show (if that’s all they have to go by).
5. Send it along with slides when you approach galleries.
6. Post it on your website along with images of your work.
7. Make your mom read it so she will finally understand.
* generated using the CRAP Generator – a grad school “must-have”
Wednesday, August 23, 2006
Hanging artwork
Recently I witnessed a couple of artists struggling to hang artwork. They would “eyeball it” - hang a couple of pieces, and when the pieces were not level, they would adjust the nails, putting unnecessary holes in the wall, causing frustration, and wasting a lot of time.
I’ve hung many shows with art groups, hung a lot of my own shows, and I’ve been a gallery assistant. I’ve learned a few tricks about hanging artwork quickly and easily.
Math
If you’re like me, you majored in art so you wouldn’t have to do math. And while you really don’t need all that algebra you learned, you do need to be able to do some basic adding and subtracting. So buck up, little artists! Luckily, we’re allowed to use calculators out here in the real world.
Tools
You’ll need a few basic tools for smooth installation:
Tape measure
Pencil and paper
Level
Hooks and nails
Calculator
Ladder
Glass or Plexiglas cleaner and paper towels (if necessary)
String (optional)
Preparation
Prepare your artwork for installation by attaching wire to the backs. Saw-tooth hangers are not reliable (and you won’t appear professional if you use them). It’s also recommended to put little rubber or felt pads on the back of the piece at the bottom. This helps to protect the wall from any paint rubbing off the frame. A bonus with the rubber ones – the can help keep the piece in place as you’re adjusting for level.
In some cases wire is not an option. You may need to hang the artwork using screws or you might need to make some sort of cleat. That’s a topic for another post.
Laying out the show
Bring all your prepared artwork to the space where it will hang. Start by spreading out the pieces and putting them against the wall where you think they might look good. Move the pieces around until you think they look perfect. Enlist an objective person to help with this.
Some things to consider – mixing up or grouping the artwork according to size, color, or theme. Some artists like to include one particularly strong piece on each wall. You might also consider hanging your strongest piece in the spot where the viewer will see it first upon entering the space.
The amount of work in the show is also important. You don’t want it to be sparse, but you also don’t want to overwhelm the viewer with too much to look at (unless, of course, that is your intent). Cay Lang touches on this in Taking the Leap:
“You should be able to look at each work of art without having the piece next to it insist on equal time. It is okay to glimpse other pieces with your peripheral vision, but it should be clear that each piece in the show is meant to be enjoyed as its own experience. If two paintings are placed too close together, they will be seen as one piece. Hanging too many pieces in a show is a common mistake of amateur artists, so a good rule of thumb is: Once you have placed the work, remove one piece from each wall.” (139)
Installation
OK, so now you have everything in its perfect spot. Let's get it on the walls.
Most artwork is best viewed with the center at eye level, which is usually at 60” from the floor. If you are hanging many pieces (and especially if you are hanging salon-style), it’s helpful to have a guide at the center point. You can create a guide by stretching a string across the wall at 60” (hang the string with nails or thumb tacks).
Gallery style
If you’re not grouping pieces together, this is a fairly quick and easy way to install artwork:
First, measure the height of your piece. Our example is 20” high
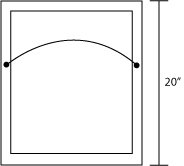 Figure half of that: 10”
Add that to 60”, so 70” (the top of the piece will be 70” from the floor)
Put the end of your tape measure on the wire and pull up a bit to find the distance from the top of the taut wire to the top of your piece. Our example is 5”
 Subtract that from 10”, so that gives us 5”
Subtract that from 70”, so we will hang our nail at 65”
(This is really hard to describe in writing! Hopefully the graphics will help.)
Keep in mind that the wires will most likely be at different places on each piece, so you’ll need to measure the wire each time.
You’ll probably want to measure the distance between pieces, too, especially if they’re very close together.
Here’s a tip for doing that:
Figure the distance that you want to have between artwork: in our case, 20”
Measure the width of the next piece: 8”
Measure 28” from the edge of the first piece.
Then measure up 64” (our wire height changed on the second piece)
 You also need to take into account the position of the hooks. The bottom of the hook will be where you make your mark on the wall. So the nail will actually go in the wall above your mark:
 Salon Style (String method)
You’ll definitely want a string at 60” for this method.

Arrange all the paintings on the floor so that you’re happy with the way they work together.
Measure the length of the wall: In our case, 120”
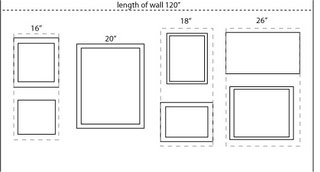 Measure the horizontal lengths of the paintings and add them together.
If there are paintings stacked on top of each other (we’ll call these a set), measure the widest one.
Add these measurements together: We get 76”
Subtract that number from the length of the wall: 120-80 = 40
Count the total numbers of sets of paintings and add 1: Our 4 sets + 1 = 5
Divide 40 by 5: 8 This is the amount of space that you will leave between sets of paintings and the walls.

Now decide how much space you want to put between the stacked or vertical pieces: We’ll choose 4”.
For the first set – add the heights of each painting and add the space between: This gives us 26”
 Divide this by 2 and add to 60. (13 + 60 = 73)
This is where the top of the upper piece will be.
Measure the distance from the top of the painting to the wire: Ours is 4”
Subtract this from that larger number: 73 – 4 = 69
This is where the hook will go for the upper piece.
 To figure where to put the hook for the lower piece, measure the distance from the top of the painting to the wire: Ours is 3”
Add this to the space between paintings that you chose at the beginning: 3 + 4 = 7)
Measure down 7” from the bottom of the upper piece. This is where you put the hook for the lower piece.

Theoretically, the center of the group should be at 60”:
 To hang the next set of paintings, measure the width of the next set: in our case we only have one painting, and it’s 20” wide.
Figure half of the width: 10”
Add this to the distance between that we established earlier: 10 + 8 = 18
Measure 18” from the edge of the widest piece in the first set.
Then measure up 67” (using the method we used earlier).
 Then measure up 67” (using the method we used earlier).
Continue on for each set.
This method also works for diptychs, triptychs, and other multi-paneled works.
Lighting
Once the artwork is in place, adjust the lighting. Climb up the ladder and adjust the spotlights so that the lighting is even over each piece. Lighting will vary from space to space. Some galleries have better lighting than others.
Labels
Some galleries will provide you with numbers to put on the wall that correspond to a price list. If you’re doing it yourself, you might want to make some labels. I prefer the clear address labels that you can get at office supply stores.
Standard label text:
Name of Artist
Title
media
Example:
Joe Schmo
Landscape Masterpiece
oil on canvas
The placement of the labels should be consistent. Standard placement is on the right side of the piece, at 48”:
 Price List
Most galleries won’t put prices on the wall labels but will have a price list available for viewers to peruse on their own. Create a list that includes title, media, size, and price.
Example:
Landscape Masterpiece oil on canvas 24” x 36” $350
(note – size of artwork is generally listed height first - height" x width")
I hope this makes sense. It’s much easier to show someone how to do it than to try to write it all out.
If you have any questions, please leave a comment or email me at deanna at deannawood dot com
I’ve hung many shows with art groups, hung a lot of my own shows, and I’ve been a gallery assistant. I’ve learned a few tricks about hanging artwork quickly and easily.
Math
If you’re like me, you majored in art so you wouldn’t have to do math. And while you really don’t need all that algebra you learned, you do need to be able to do some basic adding and subtracting. So buck up, little artists! Luckily, we’re allowed to use calculators out here in the real world.
Tools
You’ll need a few basic tools for smooth installation:
Tape measure
Pencil and paper
Level
Hooks and nails
Calculator
Ladder
Glass or Plexiglas cleaner and paper towels (if necessary)
String (optional)
Preparation
Prepare your artwork for installation by attaching wire to the backs. Saw-tooth hangers are not reliable (and you won’t appear professional if you use them). It’s also recommended to put little rubber or felt pads on the back of the piece at the bottom. This helps to protect the wall from any paint rubbing off the frame. A bonus with the rubber ones – the can help keep the piece in place as you’re adjusting for level.
In some cases wire is not an option. You may need to hang the artwork using screws or you might need to make some sort of cleat. That’s a topic for another post.
Laying out the show
Bring all your prepared artwork to the space where it will hang. Start by spreading out the pieces and putting them against the wall where you think they might look good. Move the pieces around until you think they look perfect. Enlist an objective person to help with this.
Some things to consider – mixing up or grouping the artwork according to size, color, or theme. Some artists like to include one particularly strong piece on each wall. You might also consider hanging your strongest piece in the spot where the viewer will see it first upon entering the space.
The amount of work in the show is also important. You don’t want it to be sparse, but you also don’t want to overwhelm the viewer with too much to look at (unless, of course, that is your intent). Cay Lang touches on this in Taking the Leap:
“You should be able to look at each work of art without having the piece next to it insist on equal time. It is okay to glimpse other pieces with your peripheral vision, but it should be clear that each piece in the show is meant to be enjoyed as its own experience. If two paintings are placed too close together, they will be seen as one piece. Hanging too many pieces in a show is a common mistake of amateur artists, so a good rule of thumb is: Once you have placed the work, remove one piece from each wall.” (139)
Installation
OK, so now you have everything in its perfect spot. Let's get it on the walls.
Most artwork is best viewed with the center at eye level, which is usually at 60” from the floor. If you are hanging many pieces (and especially if you are hanging salon-style), it’s helpful to have a guide at the center point. You can create a guide by stretching a string across the wall at 60” (hang the string with nails or thumb tacks).
Gallery style
If you’re not grouping pieces together, this is a fairly quick and easy way to install artwork:
First, measure the height of your piece. Our example is 20” high
 Figure half of that: 10”
Add that to 60”, so 70” (the top of the piece will be 70” from the floor)
Put the end of your tape measure on the wire and pull up a bit to find the distance from the top of the taut wire to the top of your piece. Our example is 5”
 Subtract that from 10”, so that gives us 5”
Subtract that from 70”, so we will hang our nail at 65”
(This is really hard to describe in writing! Hopefully the graphics will help.)
Keep in mind that the wires will most likely be at different places on each piece, so you’ll need to measure the wire each time.
You’ll probably want to measure the distance between pieces, too, especially if they’re very close together.
Here’s a tip for doing that:
Figure the distance that you want to have between artwork: in our case, 20”
Measure the width of the next piece: 8”
Measure 28” from the edge of the first piece.
Then measure up 64” (our wire height changed on the second piece)
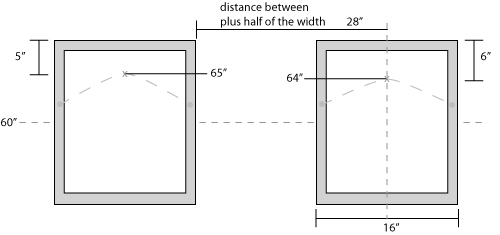 You also need to take into account the position of the hooks. The bottom of the hook will be where you make your mark on the wall. So the nail will actually go in the wall above your mark:
 Salon Style (String method)
You’ll definitely want a string at 60” for this method.
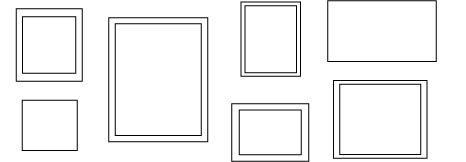
Arrange all the paintings on the floor so that you’re happy with the way they work together.
Measure the length of the wall: In our case, 120”
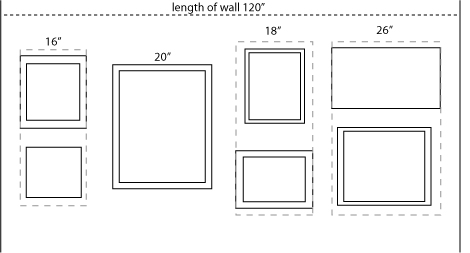 Measure the horizontal lengths of the paintings and add them together.
If there are paintings stacked on top of each other (we’ll call these a set), measure the widest one.
Add these measurements together: We get 76”
Subtract that number from the length of the wall: 120-80 = 40
Count the total numbers of sets of paintings and add 1: Our 4 sets + 1 = 5
Divide 40 by 5: 8 This is the amount of space that you will leave between sets of paintings and the walls.

Now decide how much space you want to put between the stacked or vertical pieces: We’ll choose 4”.
For the first set – add the heights of each painting and add the space between: This gives us 26”
 Divide this by 2 and add to 60. (13 + 60 = 73)
This is where the top of the upper piece will be.
Measure the distance from the top of the painting to the wire: Ours is 4”
Subtract this from that larger number: 73 – 4 = 69
This is where the hook will go for the upper piece.
 To figure where to put the hook for the lower piece, measure the distance from the top of the painting to the wire: Ours is 3”
Add this to the space between paintings that you chose at the beginning: 3 + 4 = 7)
Measure down 7” from the bottom of the upper piece. This is where you put the hook for the lower piece.

Theoretically, the center of the group should be at 60”:
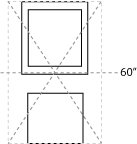 To hang the next set of paintings, measure the width of the next set: in our case we only have one painting, and it’s 20” wide.
Figure half of the width: 10”
Add this to the distance between that we established earlier: 10 + 8 = 18
Measure 18” from the edge of the widest piece in the first set.
Then measure up 67” (using the method we used earlier).
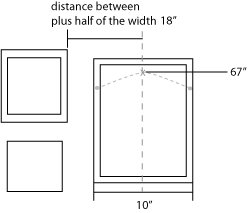 Then measure up 67” (using the method we used earlier).
Continue on for each set.
This method also works for diptychs, triptychs, and other multi-paneled works.
Lighting
Once the artwork is in place, adjust the lighting. Climb up the ladder and adjust the spotlights so that the lighting is even over each piece. Lighting will vary from space to space. Some galleries have better lighting than others.
Labels
Some galleries will provide you with numbers to put on the wall that correspond to a price list. If you’re doing it yourself, you might want to make some labels. I prefer the clear address labels that you can get at office supply stores.
Standard label text:
Name of Artist
Title
media
Example:
Joe Schmo
Landscape Masterpiece
oil on canvas
The placement of the labels should be consistent. Standard placement is on the right side of the piece, at 48”:
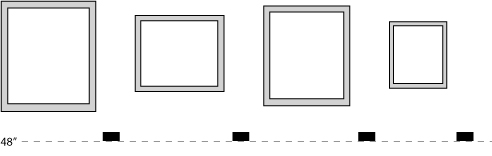 Price List
Most galleries won’t put prices on the wall labels but will have a price list available for viewers to peruse on their own. Create a list that includes title, media, size, and price.
Example:
Landscape Masterpiece oil on canvas 24” x 36” $350
(note – size of artwork is generally listed height first - height" x width")
I hope this makes sense. It’s much easier to show someone how to do it than to try to write it all out.
If you have any questions, please leave a comment or email me at deanna at deannawood dot com
Wednesday, August 16, 2006
Rejection
It sucks to be rejected. Yes. We all know that. But can there be value in rejection? I think it all depends on how you look at it and how you handle it.
How you look at it... (Cliche alert!)
I think I might have already mentioned the best fortune cookie ever - it said, "If you don't get at least one rejection a day, you're not trying hard enough." That could apply to so many things besides trying to get your work into a gallery - getting a job, dating, etc.
I got another fortune cookie once that said, "The harder you work, the luckier you get."
And then, of course, there's the quote by Wayne Gretsky (I think) that goes something like, "You miss 100% of the shots that you don't take."
OK, enough with the cheesy quotes. You get the idea. You have to blanket the world with your proposals, letters, invitations, press releases, and whatever else you have to advertise and market your work. I've said it before - just stay true to your artistic vision and keep putting your stuff out there. Eventually someone will find it and love it.
So if you like numbers, you can figure out percentages - for example, I sent out 100 brochures and I got 20 outright rejections, 15 positive letters, and 3 possible leads on gallery representation... This can help you determine your future marketing strategies.
How you handle it...
I've heard a lot of different stories about how people handle rejection. I think most artists keep their rejection letters. The ones who "make it" look back on them and remember how hard it was to achieve success. I read about one artist who wallpapered his bathroom with his rejection letters. I love that idea.
One artist posts her rejection (and acceptance!) letters on her blog, Rejection Letters of an Emerging Artist.
The Rejection Collection is a website touted as the "writer's and artist's online source for misery, commiseration, and inspiration." You can submit your rejection letters and describe how they made you feel, and read other artist's rejection letters. Misery loves company! The links page has a lots more good sites to check out. There are other writers and aritsts who actually scan in and post their rejection letters on their websites.
I read somewhere about an artist who, when he received a rejection letter, would send his own rejection letter. Saying something like, "I regret to inform you that I am not accepting rejection letters at this time." Or something like that. Funny.
Personally, I do get a little depressed when I receive a rejection letter from a gallery that I really liked or a show that I really wanted to get into. But I just file it and try to figure out what to do next. Well, that didn't work out, what can I do now?
The only thing that really really bothers me is this (venting alert!) - I send my brochure and a cover letter to galleries that I have researched online. For a while I would often not receive anything back (not even a form letter), so I started to include a SASE. This upped the amount of rejection letters (what was I thinking?), but a couple of galleries have sent back my letter and brochure to me with nothing. Not even a form letter. One of them wrote, "This is not for us," on MY cover letter and sent it back. I realize that gallery people are busy and they get a gazillion submissions a month, but that's just rude!
When I do receive a personalized note, I really appreciate it. I will often email the person to thank them for taking the time to respond personally.
So how do you handle rejection?
Wednesday, August 02, 2006
Juried Shows
Being in juried shows is a great way to get more exhibitions on your resume.
What is a juried show?
Usually an art group, gallery, art center, or museum will sponsor the show (by recruiting volunteers, raising money for prizes, and securing a venue for the exhibition). Some will use their own "expert," (or panel of experts) but most will hire a juror (or jurors) from outside of their organization. This ensures that the juror will be fair and impartial. The juror is usually an artist, curator, or art educator.
How it works
The organization will send out a prospectus or call for entries, usually a small brochure that is mailed to members, former show participants, etc. Many calls for entries are posted on websites such as the Art Deadlines List or printed in magazines such as Art Calendar or Art in America.
The prospectus
It is very important to read everything in the prospectus before you enter the show. These are the rules and regulations and if you don't follow them, you can ruin your chances of getting in the show.
Important things to note on the prospectus:
deadline for entries - sometimes they will list the postmark date and sometimes the date that items must be in their possession (an important distinction)
entry fee - obviously, they won't accept your entry without the fee
slide or file requirements - more shows are taking digital entries now, but regardless of the format you submit, follow their guidelines to the letter. If they want slides and you enter a CD, your entry will be thrown out, and vice versa. Also, if they indicate that digital files should be 72 dpi jpgs, don't send them 11 x 17 TIFFs. They won't like you.
Some smaller organizations will sponsor local or regional shows where the artists are required to submit actual artwork instead of slides or digital files. The juror will select work and give prizes from the actual artwork.
exhibition dates - I mention this because some organizations require the entries months in advance of the show. You need to decide if you want to have your work unavailable for that period of time. Also, you must make sure that your work is available if it is accepted - don't enter the same piece in multiple shows if the dates overlap.
handling fees - I've noticed that some organizations are requiring artists who are accepted into the show must pay an additional handling fee.
How do you choose which shows to enter?
There are many things to consider when entering shows. Here are just a few:
cost - personally, I don't enter shows that charge more than $25 for their entry fees. The benefit of having a line on your resume is weighed with the cost of the entry fee, framing, shipping, and insurance. Entering shows is expensive, and getting into shows is even more pricey...
juror - the status and reputation of the juror is important. I tend to look for an artist that I know of and admire or a curator of an institution that I respect. But sometimes I will also enter a show that just sounds interesting, regardless of who the juror is.
location - is the exhibition being held at a major museum or a respected art center? If the show is local, you can save on shipping costs.
Congratulations! You got into the show!
Now what? The organization will send you instructions on shipping your work to them. Usually, they will require that you use a particular shipping agent and that the work will need to arrive within a particular time frame. Most organizations will require that you pay for return shipping also. I need to do a whole post on shipping artwork in the future.
If you're lucky, they will post images of the installed work on their website. If you're super lucky, they'll also print a catalog of the exhibited work. If there is any press on the show, they will probably send you copies of the newspaper clippings, too. And if you're extra-super lucky, the reporter will mention your work (in a good way). All of this is great stuff to add to your "brag book" or whatever you call that binder full of show catalogs, press clippings, and invitations.
Prizes
Many juried shows will entice artists to join by offering prizes. They'll usually list the major prizes - $500 best of show, three $100 awards, merchandise awards, etc. Sometimes the best of show will receive a solo show in the gallery in the future. Prizes are great, but don't enter a show expecting to win.
We regret to inform you...
Bummer. It sucks to get rejected. Don't worry about it, though. Try again next year. Art is subjective and every juror will have a different opinion on the same work. One particular painting can win best of show in one show and be rejected from another. Every juror brings his or her own aesthetic background, artistis criteria, taste, etc. But I don't need to tell you that.
The more shows you enter, the more you increase your chances of getting into one. But it does get expensive, so decide what's important to you before you enter a whole bunch of shows.
Good luck!
Saturday, July 22, 2006
Emerging Encaustic Artists
Check out a new blog from another encaustic artist, Zane Vredenburg - Emerging Encaustic Artists.
Zane's goal "is to unite a handfull of passionate emerging encaustic artists so that we may encourage and spur one another on to do great things in the art community, raise awareness of the artform and critique each others work."
He does some really great work, too. Check it out.
Zane's goal "is to unite a handfull of passionate emerging encaustic artists so that we may encourage and spur one another on to do great things in the art community, raise awareness of the artform and critique each others work."
He does some really great work, too. Check it out.
Thursday, July 20, 2006
Writing an Artist's Resume
Being an artist means not only making your art but of course promoting your art. But some would argue that you’re really promoting yourself. Regardless, you need to have a good resume.
Edward Winkleman’s blog recently had a great post about resumes/bios with some really valuable information (be sure to read the comments, too). I’ll just add to it by telling you how I deal with my resume.
I created a Word document titled, “current resume,” that I update frequently. This resume includes everything. I probably wouldn’t show this resume to anyone, but it’s nice to have it all documented in case it’s needed someday. I can edit this all inclusive resume and create an alternate resume for any given situation – applying for a teaching position, submitting a proposal to a gallery, applying for a job, etc.
The all inclusive resume is divided into categories and formatted appropriately. The categories include:
Name and contact information (I put this in the header and footer so it shows up on each page)
Forthcoming Exhibitions
Exhibitions (separated by year and then into categories - solo, juried, and group)
Publications (in which I’m mentioned or my work is reviewed)
Collections (public and private)
Teaching Experience
Lectures
Education
Employment
Related Experience (volunteer positions, committees, boards, serving as a juror, etc.)
Awards
I edit down this information to create a resume to send to a gallery.
In the gallery resume, I will include:
Name and Contact Information
Forthcoming Solo Exhibitions
Venue, Location, Date
Example:
Shelbyville Community College, Shelbyville, Missouri, 2007
Selected Exhibitions
I edit the exhibitions and title it, “Selected Exhibitions.” I don’t usually include open shows or member shows, as they aren’t all that impressive (everybody usually gets in, so it’s not considered prestigious). There’s a local exhibition that I enter frequently, so I won’t usually list that unless there was a particularly well-known juror or I won an award in the show. And I do usually include the juror. Some are more well-known than others, but I think it’s good to be consistent (if you list one, you should list them all).
Example:
2005
Solo
"Freezing," Springfield Center for the Arts, Springfield, ME
Group
"Big Time Invitational," The Palomino Gallery, Arlington, CA
"Super Cool Art Exhibition," Johnstown University, Johnstown, TX
Juried
"Simple Things 2005," Sprightly Art Center, Baltimore, OK
(Juror: Stacy Smith, Executive Director, Eagle Mountain Art Center, Chicago, IL)
Public Collections
Private Collections
Publications
Use a consistent, standard formatting method (such as MLA or APA).
Example:
Johnson, John. "Paintings fill art center with life." The Springfield Times 15 Oct. 2005: 7.
Education
Example:
MFA, Studio Painting - Springfield University, Springfield, TX, 2005
Minor: Art History
This gallery resume focuses on exhibitions, collections, and education. If I were to apply for a teaching job, I would probably have a much longer resume, as more and varied activity is important for that type of position.
I don’t usually include a bio unless it is requested. I do have a short bio that I wrote myself, but I’m considering having a writer friend do a more extensive one for me.
Here are a few resources for writing an artist’s bio (some music and dance-related, but still relevant):
Durable Goods
Music Biz Academy
And some resources for resumes:
The Artist's Trust
NYFA Interactive
Tuesday, July 18, 2006
What works
I wanted to talk a little about what seems to be working for me so far.
As I mentioned in previous posts, I created a brochure that features my artwork. I went through the Art In America gallery guide issue and found the galleries that I liked. I've gotten fairly good response from those mailings. I mail a cover letter and my brochure to the gallery. If they're interested, they will contact me and ask for more information. Thanks to that strategy, I have work in one gallery, will be in a group show in another this fall, and I'm talking with two other galleries about possible representation.
Another way that I've gotten gallery interest is just by being in shows. One gallery owner saw my work in a group show and contacted me. I was also contacted recently by a consultant who saw my work in another show (although I'm still trying to figure out if they really want to represent me or if they're just trying to sell me something...).
I also donated a piece to an art auction a few months ago. I have a possible gallery lead due to a contact that I made through the auction.
So I guess the answer is to just get your work out there - the more people see your name and your work, the more likely it is that someone will want to either buy your work, represent you in their gallery, or invite you to be in a show.
I got a great fortune cookie fortune a few years ago that I think applies here: The harder you work, the luckier you get.
So what has worked for you?
Friday, July 14, 2006
“Professional Practices” classes
In my grad school, the MFA students were required to take a professional practices class. It was technically a photography class, titled “Portfolio Photography,” but it was really professional practices, with a strong emphasis on photography. The class was intended for students who were about to graduate and who were going to apply for teaching jobs or send packets to galleries. Some undergrads would take the class to work on their application packets for grad school.
I think more schools are incorporating this type of class into the studio art curriculum. It’s important for art students to have at least some idea of how to promote themselves when they get out in the “real world.”
My painting professors would include some of this real world advice every now and then, too, by requiring reading (such as Taking the Leap) and discussions. We would often watch art-related videos during our class lunch breaks. I remember one in particular that was about the business of art (I think it was one of those Art City videos).
Someone in the video was talking about how he tells his art students that they should just drop out of school, take the $40,000 they would have spent on school, and spend $1000 each on 40 parties. His point was that if you want to make it in the art world, the MFA isn’t important, but who you know is.
Depressing, no?
Anyway, I wanted to talk about the class I took and what I learned.
Photographing Artwork
Since it was a photography class, we spent some time on basic photography, how a camera works, lighting, developing slides, etc. How to use a light meter and set up lights in the studio to shoot 2-D and 3-D work.
20 slides of 2-D work shot in the studio (including artwork shot from books), 20 slides of 3-D work shot in the studio, and 20 slides of 3-D sculpture shot outdoors.
Self portraits (for promotional purposes).
Artist’s Statement
Elements of artist’s statements, writing exercises, and submit examples of good statements from other artists.
Resume or Curriculum Vitae
What to include, formatting, editing, etc.
Presentation Techniques
How to work a slide projector. How to give a successful slide presentation. Attend and review artist’s lectures.
Power Point
How to scan in slides, adjust them in Photoshop, and import them into a PowerPoint presentation along with resume and artist’s statement.
There were two final projects:
1. Create an attractively designed packet to promote yourself that includes 20 slides, resume, artist’s statement, self portrait, printed image of one piece of artwork, and CD with PowerPoint presentation (also to include 20 images, artist’s statement, and resume).
2. Present a 20-minute slide lecture on your work, using no more than 40 slides.
The class was very beneficial. I used much of what I learned to create my proposal packets that I sent to art centers and galleries. The practice giving presentations was also very valuable.
Have you taken a similar class? What do you think of these types of classes? Should they be required in university art programs?
Subscribe to:
Posts (Atom)